Remote Control
Take control of computers across your network, or across the world. Remote Control allows you to control a PC as if you were there. Includes a blazing fast search to find computers quickly
Product Links
News And Tips
Remote Control Distribution Tool Manual
IntelliAdmin Remote Control distribution tool is used to manage and install the remote control server across your LAN.
Click Here to download the distribution tool
Using the distribution tool you can lock down settings so users cannot change them, completely block access, or even remove the agent. Below is an index of the manual:
Table of contents
1. Users
2. Connections
3. Status
4. Listen Ports
5. Lock Settings
6. Authentication
7. Computer List
8. Installation
9. Removal
10. Links and other tips
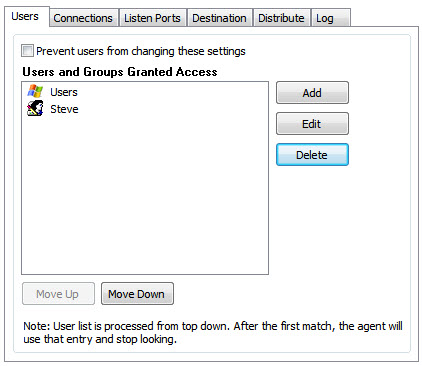
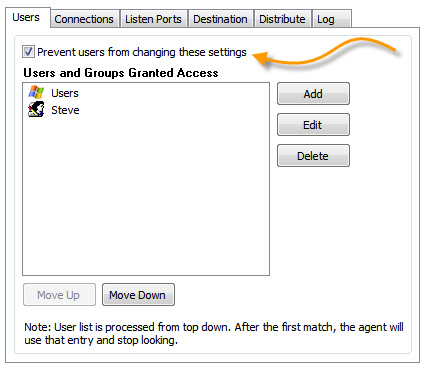
The users section allows you to determine what users can access machines, and what level of access they have:
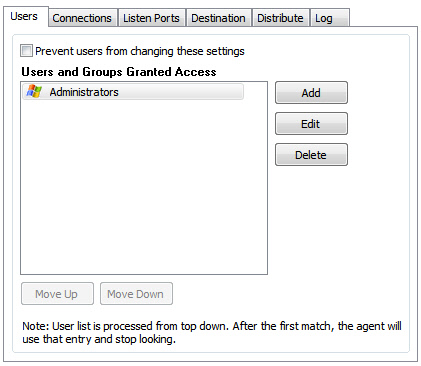
There are three types of users: Windows, Standard, and VNC. Windows users are specific windows user accounts, or windows security groups. A standard user is a simple username and password pair – it has no relation to a windows user account. A VNC user account is a password that will allow VNC clients such as RealVNC to access the agent – keep in mind that VNC accounts do not provide any encryption.
The order of the accounts is important. The remote control agent will process them from top to bottom. Why should you pay attention to the order? Lets look at an example.
We want to allow all users in a domain to have view only access, and one specific user named "John" to have full access, If we were to add them in this order:
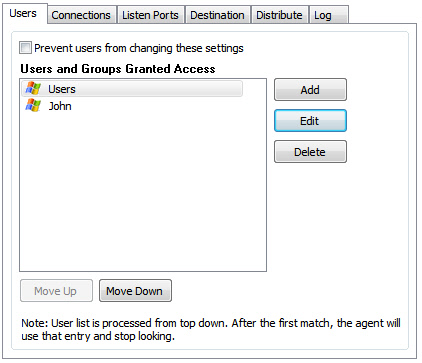
John would never get his higher level of access. Why? Because the agent will see if he matches the "Users" group – and he does. The agent stops there. To prevent this you need to put John’s account first:
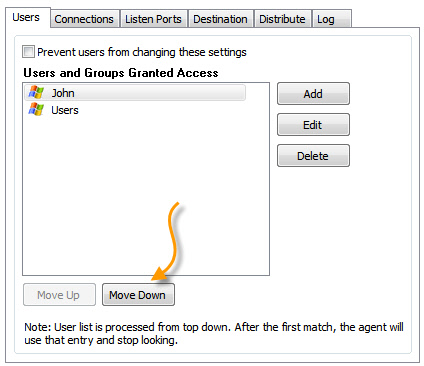
A good rule of thumb is to put the user accounts first, then groups. If you need to change the position of a user, simply use the "Move Up" and "Move Down" buttons.
Another situation to consider is when you add a standard user, and you have a Windows security group in place. For example, if you added the "Users" group and and you add a standard user named "Steve", what would happen if there were also a user named "Steve" in the "Users" group? It would depend on the order:
In the case shown above, the permissions of the "Users" group would take effect. If the "Steve" account were to be moved up, then it would take precedence over the "Users" group.
Try to keep the number of accounts to a minimum – especially Windows accounts. Each additional account requires more processing time, and it will lenghthen the time it takes for the viewer to login to the remote system.
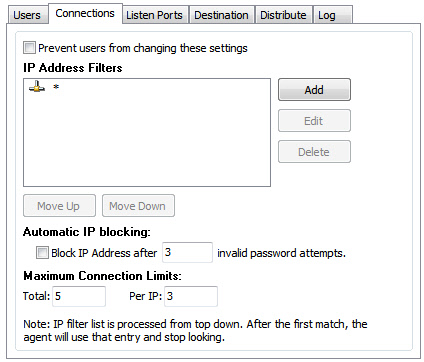
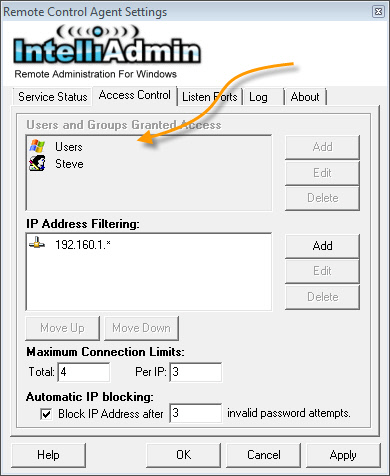
The connections tab allows you to filter IP address, limit the maximum number of connections, and setup automatic banning for users that connect with a bad password:
IP address filters are processed from the top down. When the agent finds a match, it stops processing. If we wanted to block a single IP address we could have two rules like this:
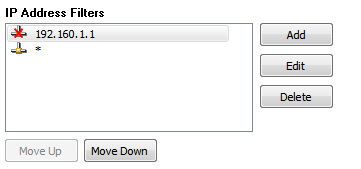
The agent would see if the remote viewer was connecting from 192.160.1.1 – if it was the connection would be terminated.
Make sure you have at least one "Allow" rule, because the agent will not allow a viewer to connect unless it matches at least one rule. This is why the default configuration has an "allow all" rule included.
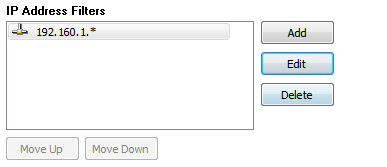
Filters can also use the * and ? wild card characters. Using the wildcard characters we could allow an entire range of IP addresses but block everything else. In this example we allow anything in the 192.168.1.* network. If the viewer connected from 192.168.1.33, or 192.168.1.27, or any 192.168.1.XXX adderess it would be allowed to connect. Any other address range would be rejected implicitly, because there are no other matching rules:
There are situations where you may want to block IP addresses automatically. The automatic blocking will be enabled for an IP address when a viewer uses an incorrect password. The default the number of bad attempts is three. When an IP address is blocked, it will be blocked for 15 minutes. The blocked address is not added to the main filter list, but is maintained in an internal list that is erased if the service is restarted:

When a viewer is blocked because of an automatic ban, you can see this in the agent’s log.
The maximum number of connections from a specific IP adderess, and the total number of connections can be limited by changing these values:

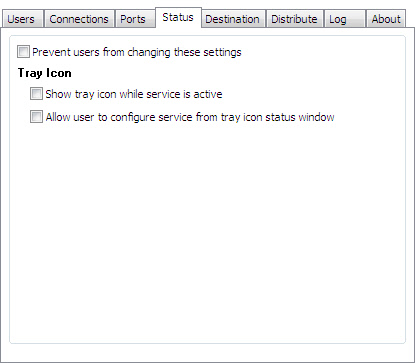
By default, the remote control service will show a tray icon by the time. When the user clicks on it they will be shown the IP address, and computer name. In addition a button is available to configure the service. The status tab has the options to disable the tray icon all together, or to simply remove the configure button:
Generally, the agent will only need to listen on port 2792, but if you plan on using VNC clients to connect to your agents you can easily add another interface for the default VNC port 5900:
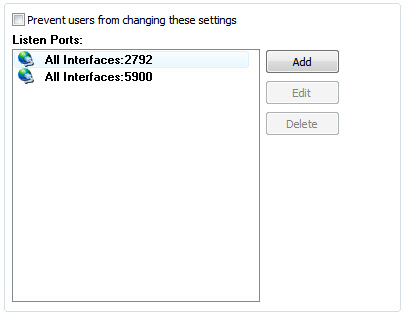
Any area of settings can be locked down, and the end user will not be able to change them. The settings can be locked by checking the box that says "Prevent users from changing these settings":
If the user tries to modify them by launching the agent settings application on their computer, the area will be disabled:
The distribution tool will need to use remote registry, and window file sharing to install and change settings. A domain administrator account is needed for this. Enter this information on the "Destination" tab. When the password is saved to the registry it is encrypted using 256 bit AES encryption:
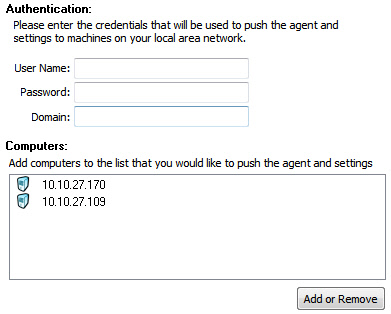
This area of the "Destination" tab allows you to create a list of computers. This list can be modified by clicking on the "Add or Remove" button.
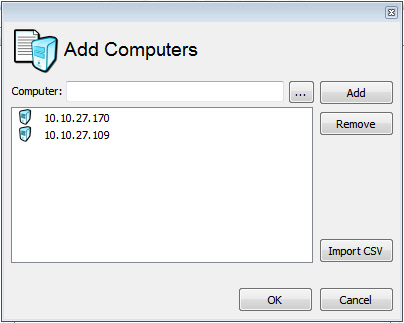
They can be imported using a CSV text file, selected from a workgroup/domain, or entered manually.
The expected CSV format would look like this:
  "Computer1","Main Office"

  "Computer2","Main Office"

  "Computer3","Back Office"
Once you have picked all of your settings, and computers you can deploy the agent. To begin the process press the "Deploy to All Computers" button:
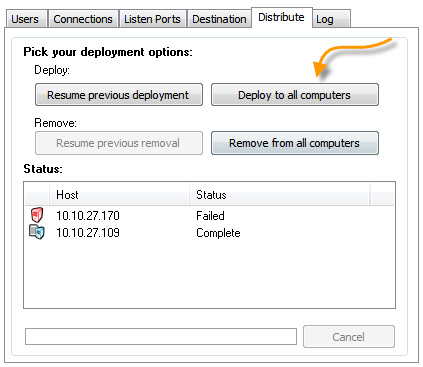
As the agent and settings are pushed to the machines, the status window will indicate the current progress. At any time you may cancel the process, and save the current status. When you launch the application again you can resume the install by clicking the "Resume Previous Deployment" button:
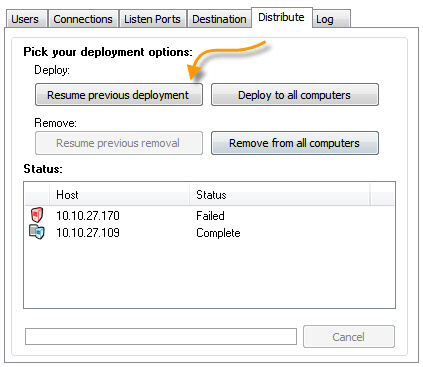
In addition to resuming computers that were never processed, it will also attempt to install to computers that failed. This is a good way to keep retrying failed machines.
The deployment tool can also be used to remove the agent. Press the "Remove from all computers" button and it will remove the agent files and settings from all of the computers in the main computer lis. If canceled, or there are failed computers, the process can be resumed by clicking on the "Resume Previous Removal" button
For the removal, or installation to work firewall, and file sharing settings must be correct on the remote machines. Here are a few links that describe how to do this using group policy, or manually:
Enable file and printer sharing using group policy
Enable file and printer sharing manually for Windows XP
Enable file and printer sharing manually for Windows Vista
If you still have any questions please feel free to send us an email at: support@intelliadmin.com and will be glad to help.