
USB Disabler Pro
Take control of your network, and prevent unauthorized use of USB flash drives. USB Disabler Pro allows you to pick specific users and grant or deny them access to USB flash drives and memory sticks.
Product Links
News And Tips
USB Disabler Pro Manual
IntelliAdmin USB Disabler Pro allows you to take control of your network and prevent unauthorized use of USB flash drives and memory sticks, without interfering with keyboards, scanners, or mice.
Table of contents
1. Installing
2. Silent Install
3. Installer Command Line Options
4. Using Group Policy to Deploy
5. Locking settings down using group policy
6. Removing Device Prompts
7. Administrator Access
8. Allowing a specific device
To install USB Disabler Pro, first download the install file to your hard drive. You can download the trial version from here:
http://www.intelliadmin.com/USBDisablerPro.msi
Run the installation, and you will be prompted to pick an administrator user group:
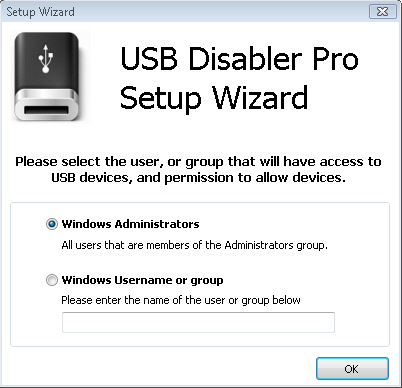
The account you select will have the ability to allow, or deny access to specific devices, change settings, and if it is enabled, all USB devices will be available to them while they are logged in.
The setup wizard picks the ‘Administrators’ group as the default option. You can select your own custom security group by selecting the second option and typing in its name.
Once you click OK, USB Disabler is active and ready to block access to USB flash drives when they are plugged in.
The installation file was designed to accept the silent option. If you are using a third party tool to deploy USB Disabler, you can call it like this from the command line:
USBDisablerPro.msi /quiet
When the silent install is executed, the default options are used:
-The ‘Administrators’ group is picked as the security group.
-Users are prompted when inserting a device.
-When administrators log in they get full access to all USB devices.
Installer Command Line Options
If you want to force custom settings during the silent install, you can send the installer settings via the command line. There are three supported options:
Users – The username or group that is granted administrative access to USB Disabler
AlertLevel – Determines if the user is prompted when a USB device is inserted. If this value is set to 1, they are prompted. If it is set to 0 the device is automatically disabled with no prompts.
AdminLevel – Determines if administrators get full access to devices, or the devices follow the same blocking rules as non administrators. If this is set to 1, administrators are allowed to access any USB device when they are logged in. If this is set to 0 an administrator needs to manually add a device to the allow list before they can use it.
These options can be passed into the MSI file via the command line in this way:
USBDisablerPro.msi /QUIET Users="IT Group" AlertLevel=0 AdminLevel=1
The above options will disable all prompts. This means members of the IT Group will always have access to any USB flash drive, while those not in it will have no flash drive access.
Group policy can be used to deploy USB Disabler across your network. This in conjunction with the group policy ADM template it is easy to manage USB Disabler over large networks.
To install USB Disabler using group policy, download the file to a location available to a domain controller. In these instructions, the software will be installed on the entire domain.
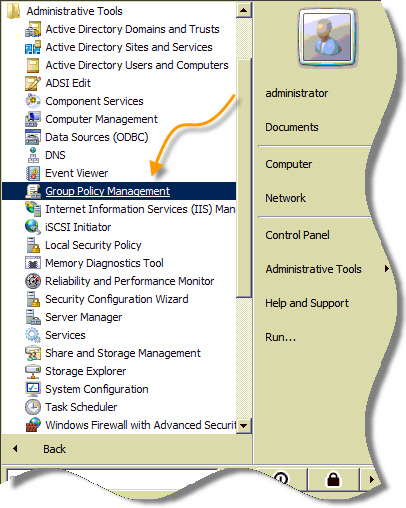
What you need to do next depends on your version of windows. For Windows 2008, click on the start menu, then Administrative tools, and finally "Group Policy Management"
Then drill down to Domains -> [Your Domain] -> Group Policy Objects. Right click on Default Domain Policy and click edit. The group policy editor will be displayed.
If you are running Windows 2003 open "Active Directory Users and Computers". Right click on your domain:
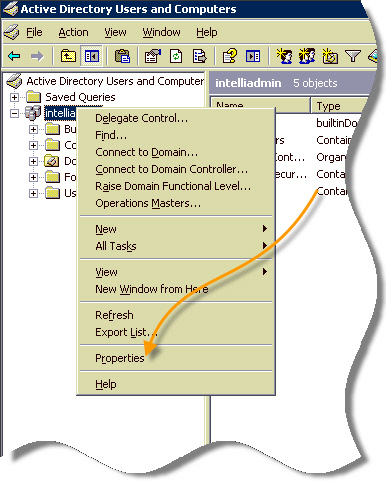
Click on properties. A dialog box will show up. Go to the tab titled "Group Policy":
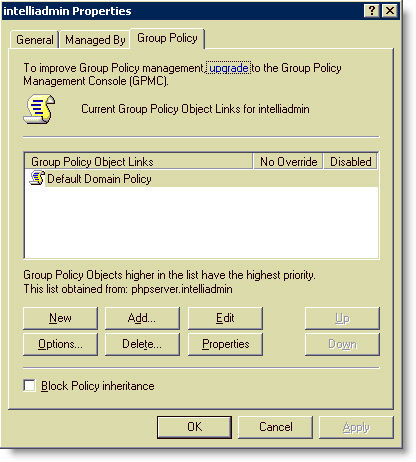
Click edit, and the group policy editor is displayed. From this point 2003, and 2008 have the same instructions.
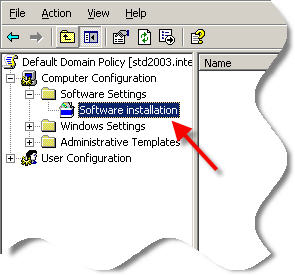
To install our file, Drill down to computer configuration, then Software Settings, and then Software installation:
Now, before you can continue, you need to place the USBDisablerPro.msi file on a public share that all computers can access.
Once you have completed this, right click on the "Software Installation" line item. Select new, then package. You will be prompted to select a MSI file. Select the file by pointing it directly to the share you are going to deploy it from.
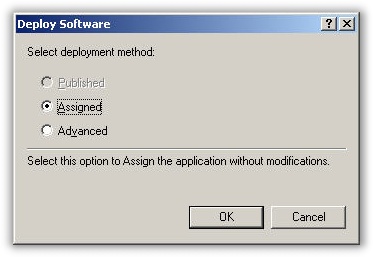
When you press OK, it will ask you for the deployment method. Pick "Assigned"
Click OK. Now, machines that are within the scope of this policy will have USB Disabler automatically installed.
Locking down settings using group policy.
Using group policy you can force settings. Once the group policy adm template is used, USB Disabler will follow those and ignore any settings provided via the command line or the settings form.
Get started by downloading the USB Disabler ADM template from here:
http://www.intelliadmin.com/USBDisablerPro.adm
Once you have downloaded it, open the group policy for the machines you want to configure. (See "Using group policy to deploy" for instructions on how to open group policy).
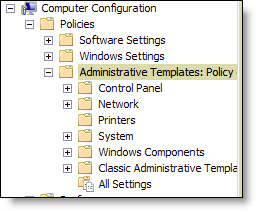
Drill down to Computer Configuration -> Policies. Right click on "Administrative Templates" and pick "Add/Remove" templates:
Now you are shown a list of custom templates that have been installed. In this screen shot, nothing has been installed.
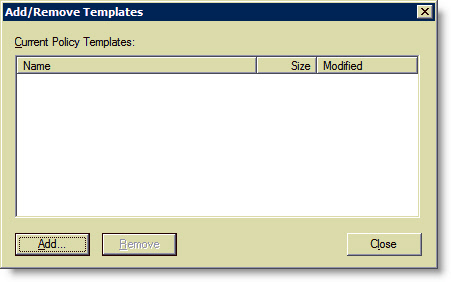
Click Add, and add the USBDisablerPro.adm file you downloaded. After you close out a new folder will appear "IntelliAdmin USB Disabler Pro" (Under 2008 this will appear under classic administrative templates)
Now you are ready to make changes. Click on the new folder titled "IntelliAdmin USB Disabler Pro", and an icon named "Settings" will appear on the right.
Double click on it and options will appear:
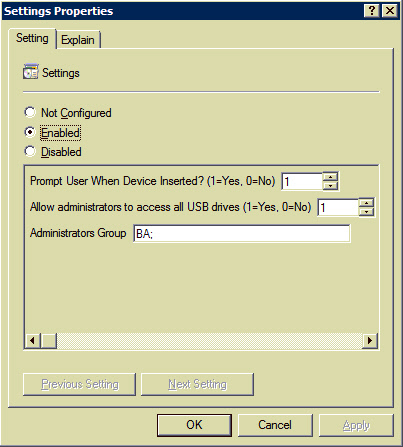
Switch the options to enabled, and you can make changes. Notice that the default group is "BA". This is an internal name that windows uses for Administrators. It is important that you use this name if you have versions of windows that are other than English. If you want to add additional user names or groups simply type them in and separate them by semicolons. Once you click OK, the settings will be applied across your network.
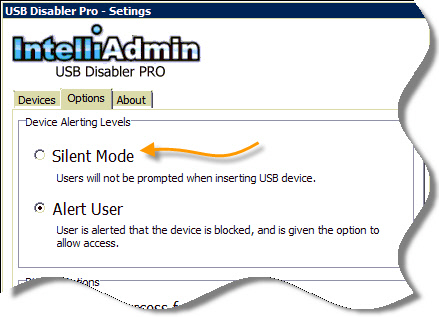
The default installation of USB Disabler will prompt users each time a new device is inserted. If you don’t want any prompts select the silent mode in the settings dialog. (At the command line this is AlertLevel=0):
Administrator Access
The default installation allows USB Disabler Administrators to access *all* USB drives. This means if a user logs in, inserts a device, they can access it immediately if the are an administrator. If they are not an administrator they will be prompted that the device was disabled, and the device will need to be added to the allowed list before they can access it.
You may want all users, including administrators, not to have access unless they explicitly add a device to the allowed list. This can be accomplished by changing the disable options to "Block all Users"

Once this option is selected, administrators will need to add a device to the allow list before they can use it.
When a new device is inserted, you will be prompted after it has been detected:
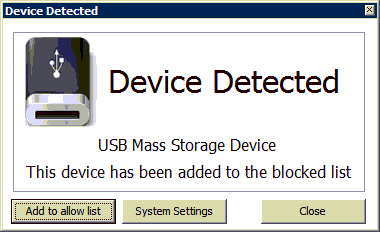
Click "Add to allow list" to allow the device.
If the device was already blocked, open the USB disabler settings by clicking on the icon in the tray:
![]()
Once you have typed in the correct password, or if you are already logged in as an administrator you will be shown the current list of blocked and allowed devices:
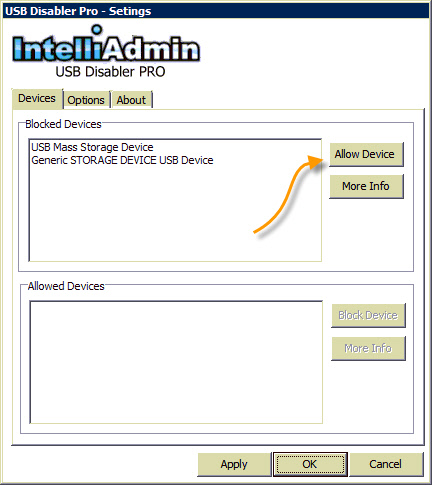
To allow a device, simply click on the device and click "Allow Device". Click OK and the device will be enabled.
If you still have questions please feel free to email us at support@intelliadmin.com We are happy to help.