Enterprise Remote Control
Enterprise remote control allows you to connect to computers from anywhere. If it is on the Internet, you can get to it. Best of all, there are no monthly fees, and no third party network - you run it all on site.
Product Links
News And Tips
Enterprise Remote Control Server Manual
The Enterprise Remote Control server allows you to remotely manage computers from anywhere. It is the central point of contact for all remote computers and viewers. This guide will walk you through setting it up on your network.
Software and Hardware requirements
Before you install the software, you want to make sure you have the proper equipment and Internet connectivity in place. The server software requires:
-Windows 2003 or Windows 2008 (32 bit and 64 bit are supported)
-512 MB of memory (512 MB needed for each additional 100 computers)
-25 MB of hard drive space
-Port 443 TCP and UDP needs to be available.
-IIS Must not use port 443 or the server will not accept any connections
If you want to control, and access computers from outside your network you will want to place the server on a public IP address with acccess to port 443 (TCP and UDP). This is not required if you want to use the Enterprise server only within your internal network.
Server Setup
Now that you have the appropriate hardware, download the latest edition of the Enterprise server from here:
Run the setup package on your server, and the setup wizard will ask you a few questions during the install process.
First, you select server’s port:
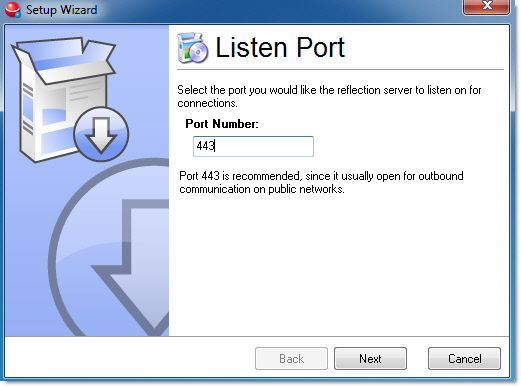
This is an important setting. We highly recommend leaving it at port 443. The reason why is that many public networks leave this open for communication. Hotels, Restaurants, and coffee shops usually allow access to this port.
Using 443 will dramatically increase the number of networks where you can get to a remote machine.
If you need to open ports on an external firewall for our software, keep in mind that it is TCP and UDP. The Enterprise server uses both.
Once you have determined the port you want to use, press next, and you are prompted for the initial user account:
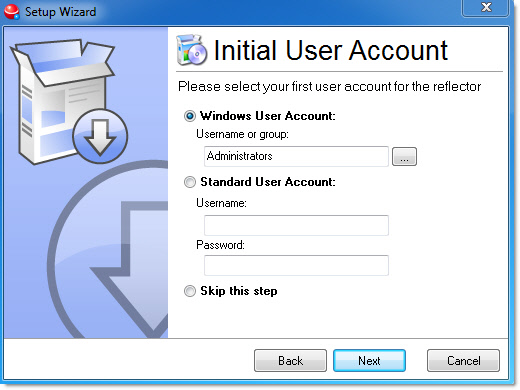
The default value is all administrator accounts. This means if it is joined to a domain, it would include local administrators, and domain administrators.
There are two types of accounts: Windows Users or groups, and standard accounts. Lets look at both:
Windows User Accounts
This type of account uses the windows security system for authentication. The username can be a Windows username or group name.
If you use a Windows group name, then any Windows user that is a member of that group will have full remote access.
The accounts are authenticated against the server where you install the Enterprise software. This means if you want to use domain accounts for controlling access, the Enterprise server must be joined to the domain.
Standard user accounts
A standard user account is not connected to the Windows security system. It is simply a username and password pair. This type of account is ideal if your server is separated from your internal network.
Once you have picked the initial account, click next and the server setup is complete.
Now that the server is running, you will want to install the Enterprise remote control agent on your computers so you can control them. Visit the Enterprise agent setup manual for details
Server Statistics
Your server is operational now, and you want to see how it is performing. Launch the Enterprise settings application from the start menu. The first thing you will see is the current server statistics:
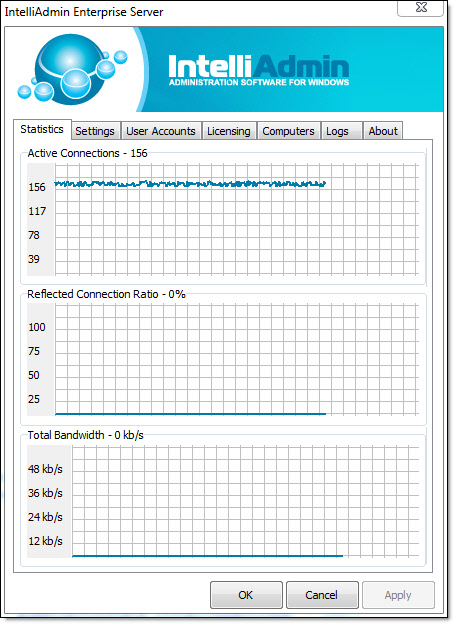
It is divided into three sections:
Active Connections:
The number of viewers and agents currently connected to the server
Reflected Connection Ratio:
This indicates the number of viewer connections the Enterprise server had to ‘reflect’. The server will reflect a connection when a direct connection to the remote host cannot be made.
Total Bandwidth:
This indicates the total inbound and outbound bandwidth the server is using for all of its current operations.
Server Settings
The server settings tab allows you to change how the server operates:
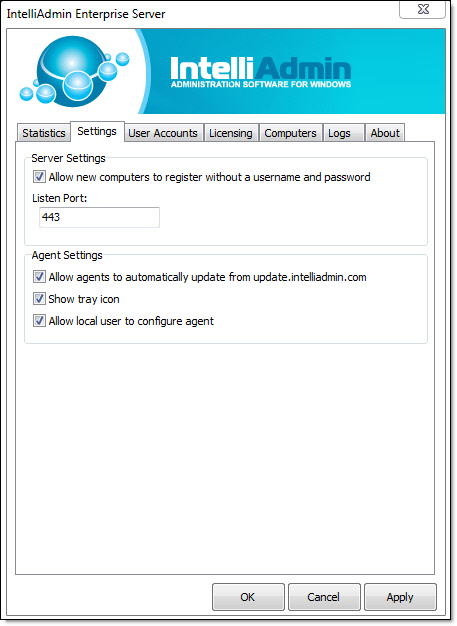
Allow agents to register without a username or password
This checkbox allows new computers to be added to the server, without providing a username and password. This can help if you had a catastrophic loss of the server, and want all of your agents to automatically re-register.
Listen Port
Next is the listen port. Change it to the value you want to use and it will become active after you press Apply. Keep in mind that 443 is ideal. The server will listen on TCP and UDP with the port number provided here.
One final note about a port change – If you change the port, all agents reporting to the server must be manually reconfigured to point to the new port.
Agent Settings
Once a remote agent is registered with the Enterprise server, all of its settings are set from this page. The settings take effect within a minute of pressing apply.
Allow agents to automatically update – Tells the agents to install new versions when they are published.
Show tray icon – When enabled, an icon indicating status is shown in the system tray.
Allow local user to configure agent – If checked, the local user is allowed to configure agent settings.
User Accounts
The user accounts tab allows you to add, edit and remove users that have access to the Enterprise server:

You can add a new user by clicking the ‘Add’ button, or edit a current one by double clicking on the user account name.
When you do this, you can setup two different types of accounts:
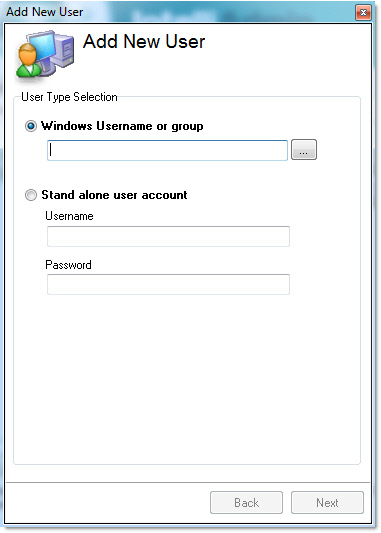
Windows User Accounts:
A windows username or group
Standard User Accounts:
A username and password pair that is not connected to the Windows security system.
Account Permissions:
Once you have picked your user account, click next and set the permissions:
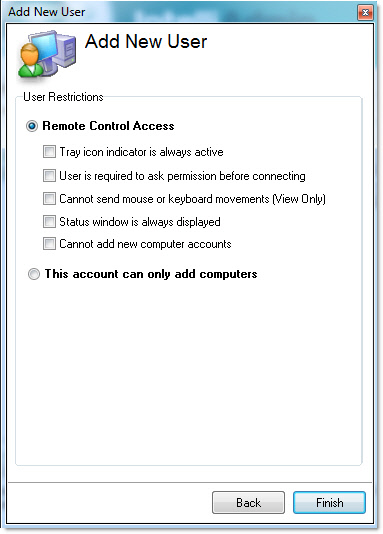
It is here that you can enforce settings for users. For example, if you want a user to always ask permission before connecting, selecting the appropriate checkbox shown above will force this – Even if they try to select something different in their viewer settings. The account settings here will always be enforced.
You can also setup a user account that is only for adding new computers. This is helpful if you want to give someone access to add computers to your server, but do not want them to have remote access rights.
Licensing
The license tab displays your current license status:
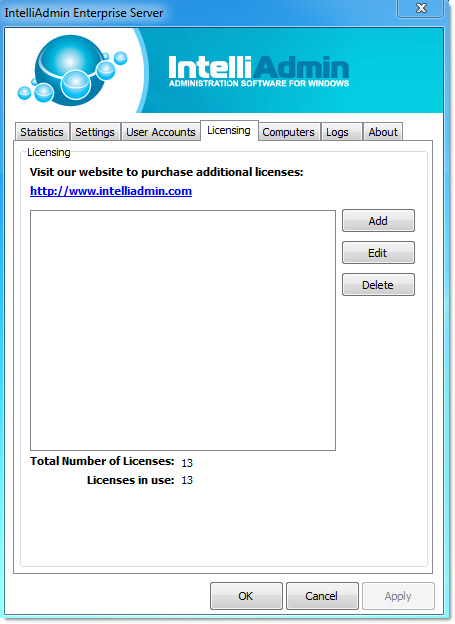
At the bottom of this tab, you can see the current number of license in use, and the total number available. If you are running out of licenses, you can free a license up by deleting a computer from the computers tab.
Computers
This tab shows the computers that are registered with the server:
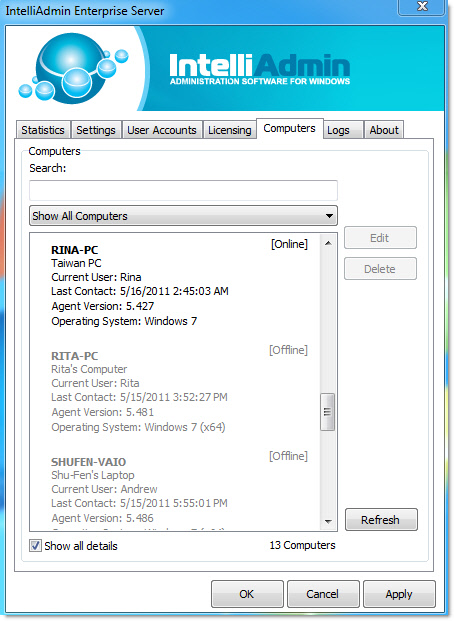
Searching, and Filtering the view
The search box at the top allows you to narrow down the list of computers, and search by operating system, user name, description, agent version, or event the name of the computer
Below the search box is a drop-down that will allow you to show only online, offline, or all computers that match your search criteria.
Computer details
By default the Enterprise server only shows you the name and description of the machine. If you want to see more details about each computer, check the box at the bottom that says “Show all details”
Computer List Management
You can remove a computer, or multiple computers by selecting them and pressing the delete button.
If you want to change the name or description used for a computer, double click on the entry and you can change it:
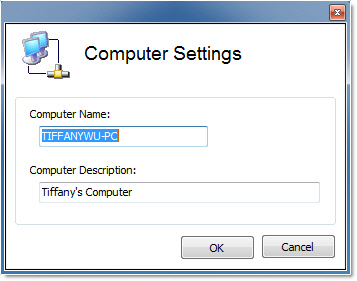
After you apply the changes, the viewers connected to your Enterprise server will see the change immediately.
Adding computers
Computers are not added here. They are added to the server by installing the agent on a computer, and telling it to register with the Enterprise server. More information can be found in the Enterprise Agent setup manual
Logging
The server logs all connections to the server, and some important operations the server makes are recorded in the server log. The log can be viewed on the log tab:
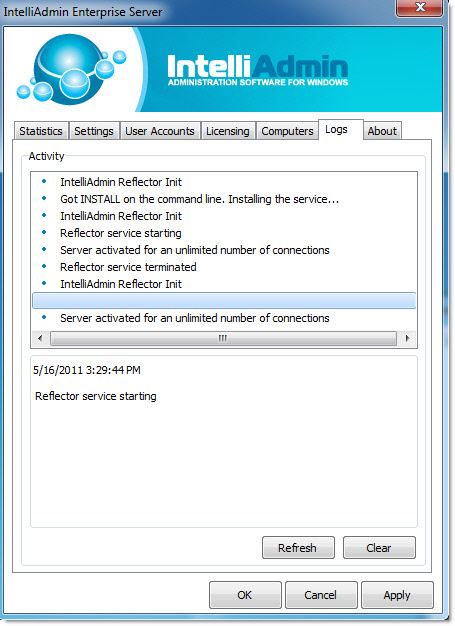
The log can be updated by pressing the refresh button, or erased by pressing the clear button.
Additional Help
Still having trouble getting your server up and running, or just have a question. Feel free to contact us at support@intelliadmin.com